|
Some basics for bootmen

Storing Boots |
|
There are various methods that Bootmen use to store boots. This tutorial explains several of the methods that have been
shared with us.
|
| |
| BOOT STORAGE ENVIRONMENT |
| Boots are made from the skins or hides of cows, snakes, and other animals. The environment
where your boots are stored is very important. Mildew, which is a type of mold, grows in dark and damp environments.
It grows fast when temperatures are above 70°F (21°C). Therefore, to store boots even for a short while, it is
important to keep the boots in a cool location where air circulates. The location should be as dry as possible. Damp basements,
garages, sheds, or other places subject to freezing temperatures, high heat, and/or humidity are not good places in which to
store boots.
Ideally, the storage area should have a controlled climate. Heating or cooling vents should not blow air directly onto boots.
Also, if a window is in the area, use blinds or curtains to prevent sunlight from falling directly onto boots. Sunlight causes
boots to dry out and colors to fade. Light, however, is a good inhibitor of mold growth, so the best storage area gets some
natural or artificial light for some period of the day.
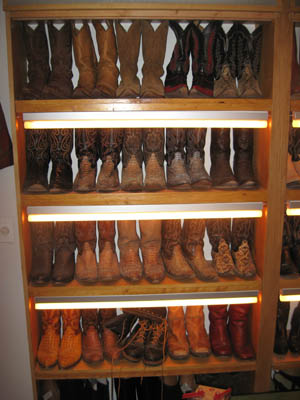
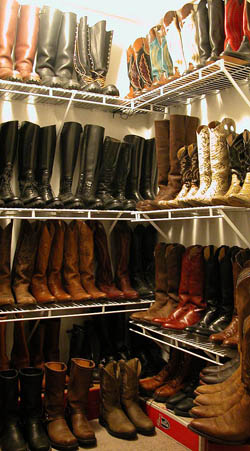
Photo at left is part of Booted Harleydude's boot closet.
|
| |
| PREPARING BOOTS FOR STORAGE |
| To help maintain the shape of boots, particularly tall ones, it is a good idea to put something
inside the boot shaft. While boot shapers are made specifically for this purpose, they are expensive. Wadded-up kraft
brown "butcher" paper is economical and just as effective to use inside boots. Cut sections of the paper about the size of
a half-sheet of newspaper. Wad it up, but not tightly. Stuff a wad of paper down into the foot. Use another at the ankle.
This will preserve the shape of the foot and prevent creasing of the ankle that occurs naturally due to the weight of the
boot shaft. Then put in one or two more wads of paper inside the shaft to maintain a round shape.
Use brown kraft paper because it does not have ink on it and is not acidic. Acid newspaper eventually may cause damage
to the inside of the boot, especially if the boot is leather lined.
|
| |
| LONG-TERM STORAGE |
|
| If you will be storing boots for a long time, or perhaps to move from one place to another,
put them in boot boxes. If you do not have any boot boxes, you can find them at any western store which often have left-over
boot boxes available free or for a low price. Alternatively, you can just buy appropriately-sized cardboard boxes from stores
that provide supplies for movers. Do not buy plastic storage boxes. These boxes seal too tightly and can actually enhance
growth of mold.
Before storing boots, clean them well to remove surface dirt, and especially mold spores which are everywhere. Treat the
boots with a good leather conditioner, such as Lexol. If you have boots that take a good shine, then shine them up before
putting them away. Wad up some brown kraft paper and push the paper wads into the boot foot and shafts. But don't
cram the paper inside boots. Use enough to maintain the boot shape, but not packed tightly. Then wrap each boot in some
plain kraft or tissue paper. Do not use newspaper, because the acidic content of the paper and the paper's ink could damage
boots stored this way. Also, do not put the boots in plastic bags inside a box. Plastic does not breathe, and could enhance
an environment for mold to grow on the boots.
Place one pair of boots into a boot box -- don't overpack! Close the box, but do not seal it with tape. If you create a sealed
environment, inevitably, mold will begin to grow.
Put the boxes of boots in a cool, dry environment. Avoid storing them near any source of heat, or in a humid location
such as a garage, carport, or storage facility that is not climate controlled.
|
| |
| DISPLAY - SHELVING |
| Storing boots on shelves is about the most common method used. If you have the option,
use shelves made of vinyl-coated wire. Wire shelves will allow air to circulate around boots to help avoid mold damage,
particularly inside the foot of the boot or on the soles. Keep space between the boots and the boot shafts for air circulation.
You may have to dust the boots from time to time if you do not wear them regularly.
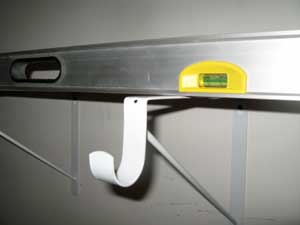
It is okay to store boots on wood shelves, such as BHD's boot closet shown in the picture at the top of this page.
The only problem with shelves is that not only do you have to dust the boots from time to time, you have to dust the
shelves, too! Removing dust is important because mold spores accumulate in dust. Even if you don't like to do it, you
have to dust both the shelves and the boots periodically.
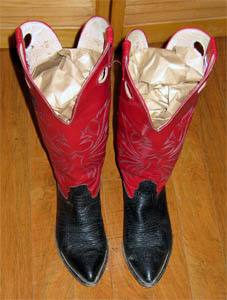
Photo at left provided by "BootsNH".
|
| |
| DISPLAY - HANGING |
|
Hanging boots is a great option, especially if space is tight. This method also gets boots up off
the floor, out of the way, and provides a natural way for air to circulate around them. Also, when a boot is hanging, it will
keep the boot from having extensive creases at the ankle.
Here is how to construct a "hanging" boot storage system.
|
| |
| Rods |
|

| Expandable shower curtain rods are an excellent choice from which to hang boots. You can
also use regular curtain rods. Since wood warps over time, metal rods are preferable. Shower or curtain rods are sturdy yet
inexpensive and are easily found at building supplies retailers and home goods stores.
|
| |
| Installing Brackets and Rods |
|
|
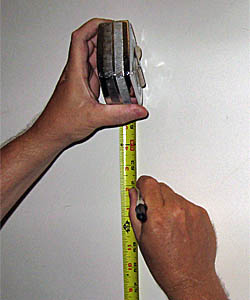
Look at the area where you want to hang boots. Reach out with your hand at the height of your head. This is your natural
reach. Identify that height with a horizontal pencil mark on the wall. Next, measure the shortest boots that you
will be hanging. These are the boots that should go on the top rod. Divide the height of the boot by two. Then add 3" (7.5cm).
Call this "Distance H". From the pencil mark of your natural height, measure up on the wall by Distance H. That is the height
at which the top rod should be positioned. This height will have the boots hang at the height of your natural reach.
To determine how far apart to space rods in height, measure the tallest of the remaining boots that you want to hang.
Then add 6" (15cm). Install the next lower rod at this height. You may be able to install one more rod at a lower height
provided the boots to store will fit after you measure their height.
Identify an area where you can install a rod and attach it to a wall on both sides at least 8" (20cm) away from the wall.
You can also use use brackets with a hook at the end, such as shown here. Brackets should allow for the rod to be spaced
away from the wall at least 8" (20cm).
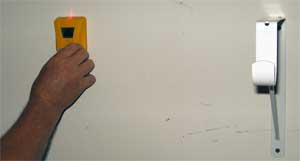
If you use brackets, use a stud finder to identify the location of wall studs, which are usually (in the U.S.) 16" apart behind
drywall. Screw brackets into wall studs -- not into drywall alone (even with an anchor, brackets attached only to drywall
will not be able to hold the weight of a number of boots). Make sure the rod is level.
|
| |
| "S" Hooks |
|
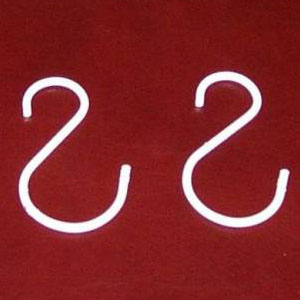
There are various hooks you can buy or make. Hooks used to hold shower curtains onto rods
may be suitable. Gordon uses "S" hooks that are 3.5" (9cm). Hooks like these (shown at left) can be found in hardware or
craft stores. One end of the hook will need to be spread out a little bit to go over the rod. Insert the narrow end of an "S"
hook into the boot pull on each side of the boot and then hang the "S" hooks on the rod. It takes four hooks for a pair of
boots to hang properly. A pair of "S" hooks cost a couple dollars.
|
| |
| Hooks from wire hangars |
|
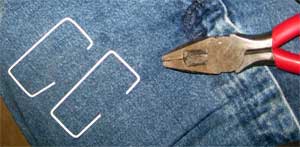
Or, you can simply make hooks from cheap wire hangers that you get from a dry cleaner or laundry, as shown at the left
on BHD's lap. Cut a straight piece of a wire hangar about 7" (18cm) long and using a sturdy pair of block-edged plyers,
bend the wire into a U-shaped hook.
|
| |
| HANGING BOOTS |

|
Boots with boot pulls on the outside or inside of the boot shaft are easiest to hang. Simply put
one end of a hook through each boot pull, and then hang the boot. You're done!
If you have boots that do not have boot pulls, it is possible to use a binder clip on the left and right side of a boot shaft,
and attach a hook to the clip. If you do that, put some kraft paper inside the clip (as shown) so if the clip oxidizes, rust
will not stain the boot.
|
| |
| HANGING BOOTS OF DIFFERENT HEIGHTS |
|
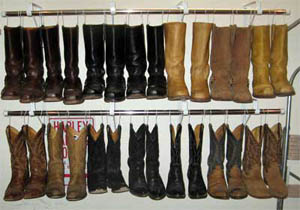
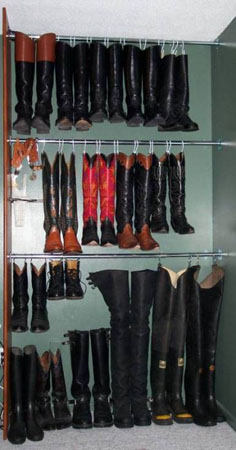
As shown in the picture of Gordon's boot closet, boots do not have to be the same height or style to be hung together.
Be creative!
Photo at left is the boot closet of Gordon from Toronto, Ontario.
|
| |
|
Content from:
Booted Harleydude of Maryland and Gordon of Toronto.
Pictures from Booted Harleydude,
BootsNH, and
Gordon.
|
More photos showing several methods of boot storage are on Page 2.
|