|
Several different methods are known
Let's take a look at all of them
Photos from Tommy
Photo from Hans
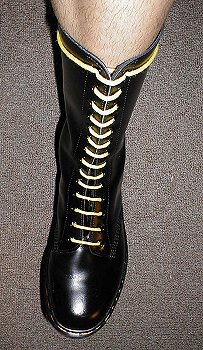
Here are several ways to ladder lace your boots. The instructions might seem to be a bit confusing
at first, but after a little practice you'll figure it out. You'll probably need to take your boots,
the laces, and the directions and try it a few times, but once you're finished, your boots will really look sharp!
First, you might want to watch these Boot Lacing Videos:
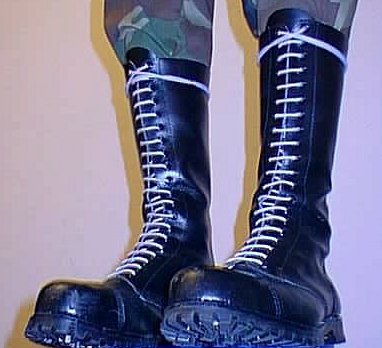
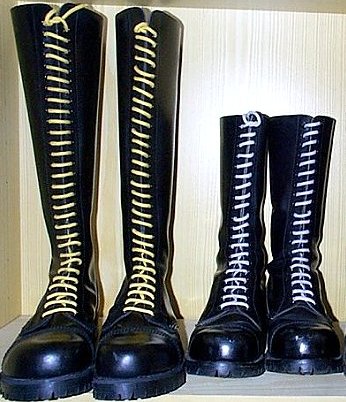
Contrasting colored laces are often used by guys who really want to show off their boots.
White laces on black boots are the most popular, but I've also seen a lot of red, some yellow and even some
blue and green laces used. Note that in some circles the color of the laces means the same thing
as someone sporting a hanky. Check the hanky code for descriptions.
If you want longer laces or colored laces, you can get them at the Vixen & Angels store in Denver, Colorado,
and at Bootlaces.com and Bootlaces For Less which you'll find in the list of
Boot Merchants on this site.
Photo from Redskin
The following information was obtained from several different sources. Credit is given where known.
- - - - - - - -
#1 -
Push the lace in through one of the top holes (i.e. Left), cross down to the opposite lower most hole (in this
example, Right) and out. Cross over to the corresponding hole opposite (Left) and go in, cross
over beneath and pop out through the 2nd hole on the other side (Right). Cross over to the
corresponding hole opposite (Left) and go in. Repeat until finished.
Start on the opposite side on your other boot, and you'll get symmetry.
When at the top, hold both laces out/up from the boot, if there's more than 1" difference you might want to
adjust the lengths. Remember that if there's a 6" difference, only a 3" adjustment is needed.
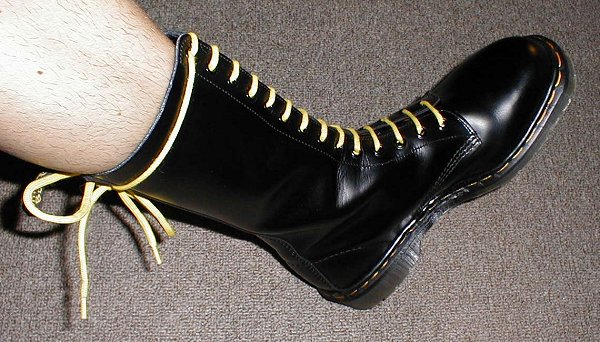
When the lengths are satisfactory, cross against each other and tie the two laces around the top of the boot,
finishing with a double knot on the front. Any loops can be turned inside the "doble
bib". When doing the "Wrap-around" at the top you'll want to make sure it is just snug, not tight.
Legs and feet need to breathe as you walk, work and flip through the gears on your bike.
- - - - - - - -
#2 -
Start out the same way as described earlier, go in through the top hole but go down to the lower most hole on
the SAME side (i.e. Left to Left) and bring the lace out there. Go across to the opposite hole (Left
to Right) and go in. When beneath the 1st eye (Right) instead of crossing over to 2nd (Left) pop
out of the 2nd on the same side (Right) and cross over to 2nd (Left) and go in. Pop out of the 3rd
eye (Left) and cross over to 3rd (Right). Continue to the top and then tie off as instructed above.
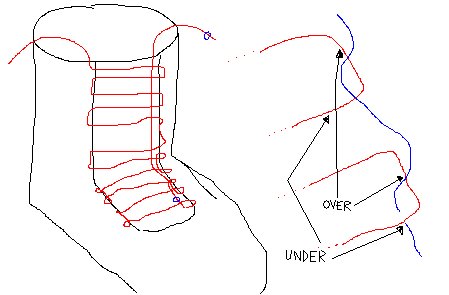
If the lace that runs down the left side of the boot is visible when you're finished with method #2, you can make
this adjustment. Take out that lace that goes from the top hole down to the lower hole on the
same side. Then thread it, as shown in the diagram below, through each bridge between the eye
holes on the left side, from the open side toward the back of the boot, all the way up to the top eyelet.
By doing this you only see the ladder lacing.
From Michael in Arkansas
- - - - - - - -
#3 -
Follow the directions for #2, but start directly beneath the first lower most hole, bring the lace out there and
work your way up to the top.
- - - - - - - -
#4 -
Insert the two ends of the laces into the two bottom holes and pull them so that they're even in length.
Now on one side go up one hole and go out. On the other side go up two holes and go out. Bring
the laces across to the opposite holes and go in.
Now go up two holes on each side and go out, cross over as above and go in, continuing to the top.
- - - - - - - -
#5 -
Starting at the bottom, lace all boots up through the eyelet, across the boot and down through the eyelet
directly opposite, then go directly up two places and repeat that threading. Once that is completed,
you lace the other end of the lacing in the same pattern through the open eyelets. What it looks like
when snugged and tied is a very neat ladder, rungs showing and verticals hidden.
But looks were not the reason for doing this; it is all about safety. In the event of an injury to the foot, ankle
or lower leg severe enough to cause serious swelling, you can simply cut the laces with a sharp knife and a
single pass of the blade. This will open the boot very quickly and allow the blood to begin it's work.
Keeping the boot laced can lead to more serious injuries developing, so cut the lace and save the leg.
From Lex Leighton
|